Showing posts with label recipe. Show all posts

Monday, March 20, 2023

Spicy Apple Cake


I came across the recipe when a quart of milk went sour in my refrigerator. I hate to waste food, so I searched online for recipes that required sour milk in their ingredients--you would be surprised how many recipes there are that use sour milk! I found this Apple Cake recipe, and after some adjustments that I made in the spice content to make it even more flavorful, it became a family favorite!

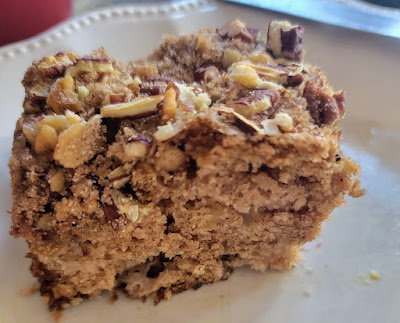
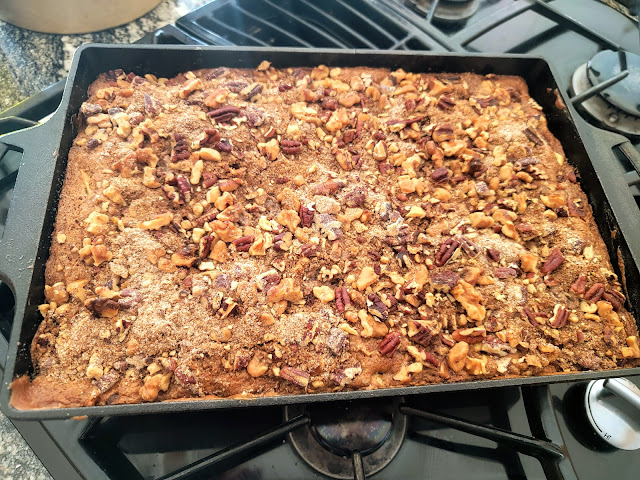
It's full of warm spices like cardamon, cinnamon, nutmeg, ginger, cloves, and allspice, and has a sugary, crusty, nut topping.  It's made in a 9 by 13-inch pan, and just a small square slice of the cake is very satisfying.  


Spicy Apple Cake

Ingredients

Topping:


1/2 cup chopped walnuts
1/2  cup chopped pecans
1/4 cup white sugar
1/4 cup brown sugar
1 teaspoon ground cinnamon
1 teaspoon ground cardamon
1/2 teaspoon allspice

Cake:

2 ¼ cups all-purpose flour
1 cup white sugar
½ cup brown sugar
2 teaspoons ground cinnamon* 
2 teaspoons cardamom*
1/2  teaspoon ginger*
1/2 teaspoon nutmeg*
1/2 teaspoon ground cloves*
1/2 teaspoon allspice*

*  This recipe can be customized to suit your preferences; start by making substitutions of 1/4 to 1/2 teaspoon if you want to increase the amount of one spice or swap out a different one. If you like it heavy on the cinnamon, use a little more.

1 teaspoon baking soda
¼ teaspoon salt
½ cup vegetable oil
1 teaspoon vanilla
2 large eggs, beaten
1 cup sour milk* (see below how to make sour milk)
2 cups apples - peeled, cored, and chopped into small pieces.** 

* To make sour milk, measure one cup of milk into a small bowl and add 1 tablespoon (15 mL) of vinegar or lemon juice, and enough milk to equal 1 cup (250 mL). Stir and let stand for 5 minutes before using. This will give the right amount of acidity for the recipe

** I like Honeycrisp or Granny Smith green apples for this cake as I find their flavor works well with the spices, and they won’t go totally mushy.


Directions:

Preheat the oven to 350 degrees F (175 degrees C). Grease and flour a 9x13-inch pan.

Make the topping: Mix together walnuts, both sugars, and all spices together in a bowl.

Make the cake: Mix together flour, both sugars, spices, and salt in a large bowl. Make a well in the center and pour in the sour milk, oil, vanilla, and eggs. Beat with an electric mixer until smooth, then fold in chopped apples.

Pour batter into the prepared pan and sprinkle topping mixture evenly over top.

Bake in the preheated oven until a toothpick inserted into the center of the cake comes out clean, about 45 minutes.


Spicy Apple Cake fresh out of the oven!


The cake is delicious when served warm or cold. 

I hope you will also enjoy it!


As you can see in the photo collage above, I made a Spicy Apple Cake as part of our dessert for our St. Patrick's Day celebration. They were served along with Italian pastries which are specially made for St. Joseph's Feast Day, celebrated on March 19th every year.  Two delicious food traditions!


Happy Spring!

The snow has all melted in our Colorado Front Range area for now, but with all the storms coming across from the Pacific this year that may not last long.  It was a winter full of good snowpack for the Rocky Mountains and soon we will see if it will also be a cold and wet spring.  I am looking forward to seeing new deer fawns, daffodils growing, and the trees beginning to bud soon.   

How is the weather where you are?


Bookmark and Share

Monday, September 5, 2022

Palisade Peach Recipes


Peaches! 

Peaches are one of the wonderful fresh stonefruits of summer. When fully ripe they are juicy, sweet, and very versatile to add to many different recipes.


Did you know that the western slope of Colorado has the ideal climate to grow peaches?  Palisade, Colorado, has long sunny days and cool summer nights, which helps delicious fruity sugars develop and allows the peaches to grow extra large and sweet.  

The western slope of Colorado not only produces fabulous peaches but also many other vegetables, and it is also the location of many vineyards that produce wine.


In 1882 a man named John Harlow, along with his wife, planted some of the area’s earliest peach trees. He spearheaded a canal project to divert water from the Colorado River and irrigate the Palisade region.  By the beginning of the 20th century, more than twenty-five thousand pounds of peaches were being shipped from Palisade to regions across the country each year! Most of the Palisade peaches come into full ripe season between August and the end of September.


Fortunately for us, our daughter had a business trip to Palisade and came back with a box of 22 pounds of freshly-picked peaches for my husband and me.  They were large and ripe and so delicious! We left them on the counter for a few days to allow the sugars to fully develop and then we refrigerated them.  Besides eating them plain I knew I wanted to make many treats with them


Peach and Mixed Fruit Crostata

This recipe was developed by one of my favorite Italian cookbook authors, Domenica Marchetti of Domenica Cooks. Domenica also has a wonderful weekly newsletter called Buona Domenica. All of her recipes are authentic Italian cuisine and very delicious! 

 I followed Domenica's recipe except I also added some jarred jam to the peaches to add volume to my crostata. You can see the Cherry, Rasberry, and Blood Orange jam I used in the photo below--Costco sells it in a double jar in our area.   I used a double-depth pie tart pan to accommodate the extra filling.  You can do the same or stay with the original recipe to use in a regular tart pan, which I'll post below.


Domenica’s Pasta Frolla (Tender Crostata Pastry)


2 cups unbleached all-purpose flour

2/3 cup confectioners’ sugar

1 teaspoon baking powder

1/4 teaspoon fine salt

Grated zest of 1 lemon or 1 small orange—or a little of both (about 1 tablespoon)

1 stick plus 3 tablespoons (11 tablespoons total) cold unsalted butter, cut into 1/2-inch cubes

1 large egg

1 large egg yolk

Put the flour, sugar, baking powder, salt, and zest in the work bowl of a food processor fitted with a metal blade. Pulse briefly to combine. Distribute the butter around the bowl and pulse until the mixture is crumbly. Add the egg and egg yolk and process until the dough begins to clump together.

Turn the dough out onto a clean work surface and gather it together into a ball. Form the dough into two disks, one slightly larger than the other. Wrap each disk tightly in reusable or plastic wrap and refrigerate for at least 1 hour, or until well chilled (overnight is fine). Remove the dough from the refrigerator about 30 minutes before rolling it out


Domenica’s Peach Crostata


1-1/2 pounds ripe peaches, pitted, peeled, and cut into 1/2-inch slices or 1 pound frozen sliced peaches (about 3-1/2 cups)

1 firmly packed cup light brown sugar

1 tablespoon fresh lemon juice

1/4 teaspoon ground cinnamon

Pinch of freshly grated nutmeg

1 batch of Pasta Frolla, chilled and ready to roll out

Confectioners’ sugar, for serving

1. Make the filling: Put the peaches, brown sugar, and lemon juice in a medium heavy-duty saucepan. Cook over low heat to dissolve the sugar, for about 10 minutes. Raise the heat to medium and bring it to a boil. Cook, stirring often until the peaches are tender, and the liquid is thickened and syrupy about 10 minutes. Stir in the cinnamon and nutmeg, and simmer until thickened to a jam consistency, 5 to 10 minutes more. You should be able to drag a path through the bottom of the saucepan with a silicone spatula. Scrape the peaches into a heatproof bowl and let cool completely. (The preserves can be stored in an airtight container in the refrigerator for up to 2 weeks.)

2. Make and assemble the crostata: Position a rack in the lower third of the oven and heat the oven to 350°F. Have ready a 9-inch fluted tart pan with a removable bottom.

3. Lightly dust a work surface and rolling pin with flour. Roll the larger disk of pasta frolla into an 11-inch circle, lifting and turning the dough as you roll to prevent sticking and create an even round. Gently wrap the dough around the rolling pin and unroll it over the tart pan. Gently press the dough into the pan without stretching it. Use the palm of your hand or the rolling pin to trim off the excess. Refrigerate while you roll out the second piece of dough.

4. Roll the smaller piece into a 10-inch circle and use a fluted or smooth pastry wheel or a knife to cut it into strips from 1/2 inch to 1-inch wide. (For a more traditional effect, roll the strips into ropes; otherwise, leave them flat.) Remove the crostata base from the refrigerator. Spoon the cooled peach filling into the base and spread it out into an even layer. If the filling is syrupy, use a slotted spoon to separate the peaches and syrup, and reserve the leftover syrup for another use (it’s delicious spooned over yogurt or vanilla ice cream). Position the strips of pastry on top of the peaches in a crisscross lattice pattern. You can weave the strips if you like, but the dough is fragile and tends to tear so it’s not necessary (nor is it traditional). Press the edges of the strips into the edge of the tart shell to secure and trim off the excess.

5. Set the crostata on a baking sheet (I use an old pizza pan), and bake until the crust is golden-brown, 30 to 35 minutes and the filling is bubbling. Transfer from the baking sheet to a rack to cool completely. Remove the ring and use a large, wide-angled spatula to transfer the crostata from the metal tart base to a serving plate. Dust with confectioners’ sugar before serving.


The Pasta Friolla Crust is extra light and fragrant and the Peach Crostata filling is jammy and fruity and not overly sweet, with its hint of cinnamon and nutmeg.  This is really a special treat!


  Honey Peach and Blueberry Tart.

This is a very simple and easy tart to make when you have a lot of fruit.

For the crust:

1-1/3 cups all-purpose flour
1/4 cup sugar
1/4 teaspoon ground cinnamon
1/2 cup butter, melted

Filling:

2 cups  unsweetened blueberries

2 cups unsweetened sliced peaches

1/2 cup Honey 
 

Directions:

Preheat the oven to 350°. 
In a small bowl, mix flour, sugar, and cinnamon; stir in butter just until blended. Press into a 9-in. fluted tart pan with removable bottom. Bake for 15-20 minutes or until lightly browned. Cool on a wire rack.

Layer sliced peaches and blueberries as desired on top of the cooled tart crust  Brush the top of the fruit with the honey.

Return the tart to the 350 oven and cook for around 30 minutes until the fruit is soft and the tart crust is golden.

Cool before serving. Nice served with ice cream or whip cream


We enjoyed this fruity tart for breakfast!


Buttermilk Peach Bread


I made two loves of Sue's wonderful Buttermilk Peach Bread from a recipe on her blog  The View from Great Island.   I froze one loaf for the future and the other we enjoyed at breakfast.  It is a simple and delicious recipe that bakes up into a dense pound-like cake filled with peaches.  It is perfect any time of the day!  You can see Sue's recipe at this link.  


    Summer Peach and Tomato Salad


I made two of these salads as dinner one hot summer evening.  On a bed of arugula I placed a large fresh sliced tomato from our garden along with a large sliced peach, two slices of thin cut Proscuitto cut into pieces, three ripe figs each cut in half, a few pickled jalapeno slices, and a half of a round of fresh burrata cheese, and drizzled it all with a Balsamic vinegar syrup.  It was the perfect savory combination of sweet, salty, creamy, and spicy.  It was so good with a side of crusty bread and a glass of wine.


We really enjoyed our delicious local  
Palisade Peaches!


What local produce have you enjoyed this summer?

You can also find me on


Bookmark and Share

Monday, December 12, 2016

Nonna's Savory Calabrian Zeppole


The Christmas season is such a busy time of the year, but it is also a time for recreating wonderful traditions and adding on new ones. One tradition my husband and I have reinstated, after moving to Colorado from New York City four years ago, is making a savory, fried potato dough taste treats called Zeppole. They are Calabrian style, and not to be confused with the sweet doughnut type that is also served warm and covered with powdered sugar, which is more Roman or Neapolitan style, and often sold at Italian street festivals. My husband's mother and oldest sister made zeppole the afternoon of every Christmas Eve, and often on other occasions when a crowd of people would gather, such as family birthdays.


Making zeppole was truly a family affair, often with friends, siblings, and their spouses, children, and grandchildren all gathered in the kitchen to help. They would take pieces of dough and twist them to drop in the frying pans filled with hot oil, helping to turn them as they fried, and then greedily gobbling them up after they were cooked.  Some zeppoles were made with plain dough, but many that followed, and our favorites, were made by twisting the dough around a nice big anchovy.  The combination of the salty anchovy and fried potato dough was quite addictive!  We could eat many of them, while also enjoying a glass, or two, of red wine.


My husband immigrated to the United States as a child, with his parents and siblings from a small hilltop town in Southern Italy near the Ionian Sea, from the Provinces of Reggio Calabria. This is a postcard view of his town. Each region in Italy and even each town has its own variations for making many traditional Italian foods, all of them delicious, but some with quite different ingredients, according to what was available in each town.   The following is the recipe my mother-in-law used, and what my oldest sister-in-law always makes. They would make large quantities of zeppole, as they were always made for festive occasions and served to a lot of people, but my husband and I cut the recipe in half, which was a more reasonable portion for us to enjoy with our family here in Colorado.


Nonna's Savory Calabrian Zeppole

Ingredients:

2.5 pounds of potatoes
6 cubes of active wet yeast (found in the refrigerated section of the grocery, often near the eggs or dairy)
1.5 tablespoons of salt
2.5 pounds of flour 
1 pound semolina flour
Anchovies preserved in olive oil

Method:


Boil potatoes whole, with scrubbed cleaned skins, in water until fork tender. Drain, cool, peel, and use a potato ricer or food mill to mash onto a pile on a lighted floured board or clean countertop.  Make a well in the middle of the riced potatoes.


Mix the semolina flour and the white flour in a bowl. Add half the flour mix and the salt to the middle of the potato mixture.


Dissolve the active yeast cakes in one cup of warm water.  Add slowly to the potato and flour mixture a little at a time, while also adding the rest of the flour semolina mixture. Keep hands moist to help with mixing--we keep a bowl of warm water nearby to do this.  


When the potato/flour/semolina dough is all incorporated into a sticky elastic dough, knead on a lightly floured surface until it forms a smooth ball. Place the dough ball in an oiled pot, turn once to cover the dough with oil, cover the pan with a towel, and place in a warm place, without drafts, until it is doubled in size.


When the dough is doubled in size, heat oil in a skillet deep enough for the zeppole to float as it cooks. You can use olive oil if desired, but we use a canola oil/olive oil blend as it can heat at a higher temperature without smoking.  Heat the oil until it is almost boiling. You can drop a small piece of dough into the skillet to test if the oil is ready--the piece of dough will begin to sizzle and rise to the top of the oil.


With wet hands take a piece of dough and pull and roll it into a four-inch rope shape. Add the dry anchovy in the middle (if desired) and twist the dough around it.  Gently place in hot oil and fry, turning the dough as needed with forks or tongs, until it is golden in color and crisp.  


Place on paper towels to drain.  


Eat warm and enjoy! 

Uneaten zeppole can be refrigerated and warmed in a low oven to reserve.  


This Christmas season we also made time for a new tradition.  We had fun making a gingerbread house with our oldest granddaughter. She thoroughly enjoyed the process and was quite proud of the finished results!  I had to convince her that we would have to wait until Christmas to eat some of the house and that in the meantime it would be a nice decoration. 


Our tree is up--a Noble Fir from a tree farm in Oregon, and we've had some light snowfalls and chilly nights where we could enjoy a cozy fire. This is truly the most wonderful time of the year! Enjoy the season, and please tell me what your favorite tradition is this time of the year.


You can also find me on


Bookmark and Share

Sunday, March 16, 2008

Surprises for St. Paddy's

My daughter surprised me with a delivery on Friday of this pretty "Shamrocks for Good Luck" plant! I've never seen such large shamrocks with darling little white flowers. It made the perfect centerpiece for my table today, as we celebrated St. Patrick's Day with my family with a corned beef and cabbage dinner. Of course, we had to have a few samples of brews to go along with it!


I also made a soda bread and a brown bread to accompany the meal.

And, for dessert, we had a fruit and berry-topped pavlova (meringue) that my sister-in-law made, seen on the left below, and an orange cake that I made.
Yes, those are green PEEPS marshmallow chicks that I used to decorate the dish -- a little mix of the two holidays that have come so close this year!

Here is the delicious Pavlova Recipe:

4 egg whites that are at room temperature
I cup (8 oz) sugar
1 teaspoon white vinegar
1 teaspoon vanilla flavoring
1 teaspoon cornstarch
Whip cream and berries/sliced fruit of choice for topping
Preheat oven to 250 degrees

With an electric beater or hand whisk, whip room temperature egg whites in a cold glass or metal bowl until stiff and peaky, then quickly add sugar one tablespoon at a time while beating, then add the vinegar, vanilla flavoring, and cornstarch. ( Do not over beat or eggs will separate. if that happens to add another egg white or two.
Line the baking sheet with parchment paper. Draw a 10-inch circle on the parchment paper as a guide for the meringue, then turn the paper over.
Use a pastry bag with a large star tip and pipe out to make a meringue circle following the line you drew previously, then fill in the center with the eggs whites, and then make a bowl shape by building up the edges with a second layer egg white. If you don’t have a pastry bag, use a spoon to mound the meringue on the parchment paper and make a well in the middle, creating a bowl-shaped shell.

Put the meringue in the oven at 250 degrees. After 45 minutes, turn the heat off. Leave the meringue in for another hour, or until it is completely cool. You can even leave it overnight.
While the meringue is in the oven, cut up your fruit and prepare about 2 cups of whip cream
Remove the meringue bowl from the oven. Make sure it’s nice and cool—if it’s still warm, wait and try again in a little while.
Fill the meringue bowl with whipped cream and put the fruit on top and serve promptly, so the meringue does not get soggy from the fruit and cream.
It's really an easy dessert to make, it looks very impressive, and tastes delicious!
Another surprise I received this weekend was the beautiful quilt patch seen below from Edie, at The Sporadic Pack Rat blog! I won this for leaving a comment on her blog during the One World - One Heart event.

It's hard to see from the picture, but the outside of the square is a dark forest green, and the inside pattern is made of patches of material that are shades of greens, beige, browns, and burgundies. There are also beautiful delicate beads and embroidery intermingled with the stitching -- just lovely -- thank you so much, Edie! I love it!

Edie has another blog called The Irish Traveler, and she is presently in Ireland blogging about all her experiences -- go take a peek and say hello!


Bookmark and Share

Wednesday, February 20, 2008

Bolognese Ragu alla Batali and Brooklyn

I finally was able to upload my pictures from Valentine's day dinner I made for my husband. He is a native born Italian, so of course, his favorite food is pasta, and he especially loves a meat sauce or "ragu," as they say in Italian.

I use a variation of Mario Batali's Ragu Bolognese.

Watch Mario make a very enticing Ragu Bolognese in this video. Click on the arrow on screen to start:

Or, if you prefer, here is the same video on this link on YouTube:


This is Mario Batali's famous Ragu Bolognese recipe that he cooks in the video:

Ingredients:

2 tablespoons extra-virgin olive oil
2 tablespoons unsalted butter
1 medium onion, very finely chopped
4 stalks celery, very finely chopped
4 carrots, very finely chopped
5 cloves garlic, peeled and finely chopped
3/4 pound ground veal
3/4 pound ground pork
3/4 pound ground beef
1 6-ounce can tomato paste
1 cup whole milk
1 cup dry white wine
Salt to taste

1 pound spinach tagliatelle, cooked and drained
serve with grated Parmigiano-Reggiano

Procedure:


1. Heat the oil and butter in a 6- to 8-quart heavy-bottomed pot, set over medium heat, until hot. Add the onion, celery, carrots, and garlic, and cook until the vegetables are translucent but not browned, 8 to 10 minutes. Add the veal, pork, and beef. Increase the heat to high, and brown the meat, stirring frequently, for about 25 minutes. Reduce the heat to medium, and continue to cook and stir for another 20 minutes. Stir in the tomato paste, and cook for another 30 minutes. Add the milk, and cook over high heat for five minutes. Add the wine, reduce the heat to medium, and simmer for 1 to 1 1/2 hours, adding a splash of water if necessary to keep the sauce from drying out.
2. Season the ragù with salt. Remove it from the heat, and let it cool. To serve with pasta, add 2 cups of the ragù to the tagliatelle, and toss briefly over high heat. Divide among four serving bowls, and garnish with Parmigiano-Reggiano. Serves 4. (The remaining ragù can be refrigerated for up to 4 days, or frozen for up to 1 month.)

To paraphrase Mario from this video, every Italian mother and grandmother, sister, Aunt, and brother in Italy can have a different version of this recipe, and all are correct. Italy is made up of many different regions, and each region very often has their own unique variation of a popular recipe incorporating the influences of past generations.

In my Valentine Day dinner, I used an imported Calabrese Tricolore Schiaffoni pasta (translation of tricolore: "three colored," consisting of a blend of three flavors of pasta noodle traditionally one orange colored and flavored with carrot, one red colored and flavored with tomato, and one white or plain in color)

I also used the pork, veal and beef ground meat to make meatballs, which I cooked in my sauce. We prefer to eat it that way, yet the sauce retains a delicious meat flavor. I also added some browned pork sausage, and because I was adding all this meat which I wanted to cook submerged in the sauce I also added 2, 28-ounce cans of crushed tomatoes in addition to the tomato paste that the recipe calls for. Everything simmers slowly for over two hours and the sauce condenses quite a bit. At the end of cooking, I remove the meatballs and sausage and serve it on the side with the pasta dish. And, of course, a big crusty piece of Italian bread is required to sop up any remaining sauce left in your dish after you eat the pasta. Add a salad and some red wine and this meal will have you saying ...

  Lasciati andare in cucina! (Love and cook with wild abandon!)


Bookmark and Share

Tuesday, February 12, 2008

Vegetable Tripe Soup

I knew it was going to be very cold here in New York this past weekend, so I decided to make a hearty pot of soup on Friday. I went to the butcher to look for inspiration as to what to use to make a stock and saw a nice piece of tripe. Tripe is a cow's first stomach and in the USA is usually sold slightly pre-cooked. It's clean, white and honeycombed in appearance.

I grew up eating Campbell's Pepper Pot Soup whose main ingredient was tripe, as my Dad was a Pennsylvania native, and I've learned that it was a favorite soup of Philadelphian's. So, therefore, I had acquired a taste for it, although I haven't made it in years.
Tradition says that George Washington's cook made it for the first time for the Continental Army at Valley Forge in 1777-78, during the bitter winter when supplies were low.
My husband is Italian, and his mother used to cook tripe frequently when he was a child. It became one of his favorite foods, and I knew he would adore it if I made Tripe soup, so as an early Valentine's Day treat for him that's what I decided to make. To keep it heart healthy I used quite a bit of fresh vegetables. This made a large amount of soup, and I froze half for another cold winter day.

Vegetable Tripe Soup

Ingredients:

2 1/4 pounds pre-cooked tripe
16 ounces package cannellini beans, soaked overnight
one large onion - chopped into small pieces
four cloves garlic - chopped into small pieces (more or less to your taste)
one bag 16 oz carrots, chopped into small pieces
Four red peppers, chopped into small pieces
Four celery stalks and heads - chopped small pieces
2 bay leaves
one 28 oz canned crushed tomatoes
one 32 oz organic broth -- chicken or beef, or veal - or your own homemade stock of choice.
Two bunches of Swiss chard -- chopped well
6 large potatoes, diced
Red pepper -- one tbsp -- we like it hot -- use less, or none, if you don't
marjoram or oregano --one tsp dried
basil -- one bunch of leaves if fresh, one tbsp if dried
thyme -- one tsp dried
salt to taste

Preparation:

Take the boiled tripe and cut it into thin strips; simmer it covered with just enough water to cover it for another hour (it will shrink considerably) When the hour is almost up, heat the olive oil in a large casserole or pot, and sauté the onions, garlic, celery, peppers, and carrots. Strain the tripe, reserving the strained liquid. When the sauteed vegetables have become soft add the tripe. Add the strained tripe broth and the beans which have their soaking liquid discarded, the tomatoes, and the stock of your choice. Cover and simmer over a gentle flame, stirring from time to time and adding small amounts of water if needed during simmering to keep beans and vegetable submerged, cook for about 2 1/2 hours

Remove bay leaves, add chopped Swiss chard, diced potatoes, all spices and salt to taste. Stir well and simmer uncovered another half hour, until potatoes are tender.

Serve it steaming hot, with a dusting of freshly grated Parmigiano Reggiano cheese.


I served it with corn bread, but a big loaf of Italian bread would be nice also.


This the basic corn bread recipe that I've used for years:

Easy Corn Bread

Ingredients:

1- 1/4 cup flour
3/4 cup corn meal
1/4 cup sugar
2 tsp baking powder
1/2 tsp salt (optional)
1 cup milk
1/4 cup vegetable oil
2 egg whites, or one beaten egg

Preperation:

Heat oven to 400 degrees. Grease a 8 - or 9 inch pan --I use my 9 inch cast iron skillet. Combine all dry ingredients. Stir in milk, oil, and egg, mixing until just dry ingredients are moistened. Pour batter into prepared pan. Bake 20 to 25 minutes or until lightly golden brown, and wooden tooth pick inserted in center comes out clean. Serve warm.

We enjoyed our soup, and I hope if you never tried tripe before you might consider it the next time you encounter it. In Mexico tripe soup is called Menudo, in Greece it would be called
Soupa Patsas, and in the Carribean you would have Sopi Mondongo. I'm sure there is a recipe for a tripe soup in almost every cuisine.

If you've eaten it, I'd love if you tell me about the version you've had, and I hope you like mine!


Bookmark and Share